Linux Debian + Unbuntu Fixed IP Addresses
Updated 2017-02 Ubuntu 16.04 LTS, FOR METHOD 1.
Background
To check and see the IP address assigned to your network interfaces at any point in the Unity desktop, right-click the network icon (up-down arrows, e.g.) and choose “Connection Information”. Or, in a terminal:
me@myhost$ sudo ifconfig
To see even more detailed information about your networking hardware issue this command and wait a few moments:
me@myhost$ sudo lshw -class network
This page shows how to set up static IP addresses for a personal computer on a home network using both a GUI interface and another method of directly editing a configuration file. This is important in my home network for using NFS Linux-to-Linux file sharing and for using Virtual Hosts in a private LAN development environment.
Method 1: Network Manager GUI in Ubuntu Desktop
To administer the networking settings, go to System Setting (the gear icon) –> Network. You will see a window like the one below.

You may see multiple entries where I only have one. Click on the network card that you want to give a fixed IP to and then click on the “Options…” button. In the new window, like the one below, click on the “IPv4” tab and then set the Method to “Manual”.
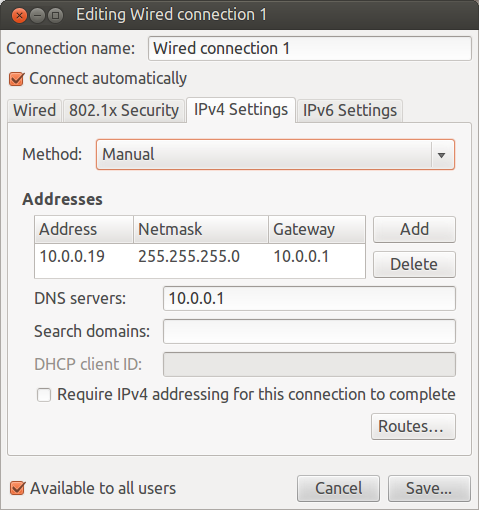
- CLick on the “Add” button.
- Click in the “Address” box and enter an IP address ON YOUR NETWORK (i.e., only change the last number).
- Netmask = 255.255.255.0
- Gatway = 192.168.1.1 (10.0.0.1, etc. It is your ISP Modem’s address)
- DNS sever = Maybe you can leave blank. Otherwise, it is your ISP Modem.
- Check “Available to all users” and click “Apply”.
- Restart the networking service. See below.
NOTE: The corresponding configuration files for the above method are in the /etc/NetworkManager directory and I don’t think they are meant to be edited. The method below is TOTALLY INDEPENDENT of this method. You probably should not combine them.
Method 2: Manually Editing the Configuration File
I found out that the file you need to edit to set networking interfaces manually is /etc/network/interfaces . Below is a *section* of the file that deals with your first Ethernet card only (eth0). I don’t understand why everything is there, so use at your own risk. I left extra information in from the file I copied it from. The “#” mark is a comment symbol and my system worked without entering these extra values. If you wanted to try this, you would edit the section for eth0 and not add an additional entry.
NOTE: You need to edit this file with “superuser” priveledges. If you are the only use in Ubuntu, then you qualify. In Debian, you can use the “su” command to become root. In Ubuntu you would use “sudo” followed by your editor command. Edit the file in a terminal using “nano”, or even use “gedit” since this is a desktop home network.
# A section of the file /etc/network/interfaces
auto eth0
iface eth0 inet static
address 192.168.1.21
netmask 255.255.255.0
#network x.x.x.x
#broadcast x.x.x.x
gateway 192.168.1.1
Restart of Networking Service is Required
You would need to restart the networking service (superuser again) no matter which method you used to change the network interface. You can always reboot your computer to make sure that networking is restarted, or you can issue the command below in a terminal.
me@myhost$ sudo service networking restart