Linux – Mount Drive on Boot + Backup Script
Summary
Update: 2026-05. I found an even easier way using for linux mount drive on boot using the “Disks” program. My old “tried and tested” method of editing the fstab file did not work in Zorin OS 18.1. For now, I am leaving both methods on this page.
This page shows a method that can be used to automatically mount a second hard disk to a computer running LInux. A way to create a daily backup is also included using rsync. In Zorin 18.1, based on Ubuntu 24.04, you can set a drive to be mounted automatically using the following steps.
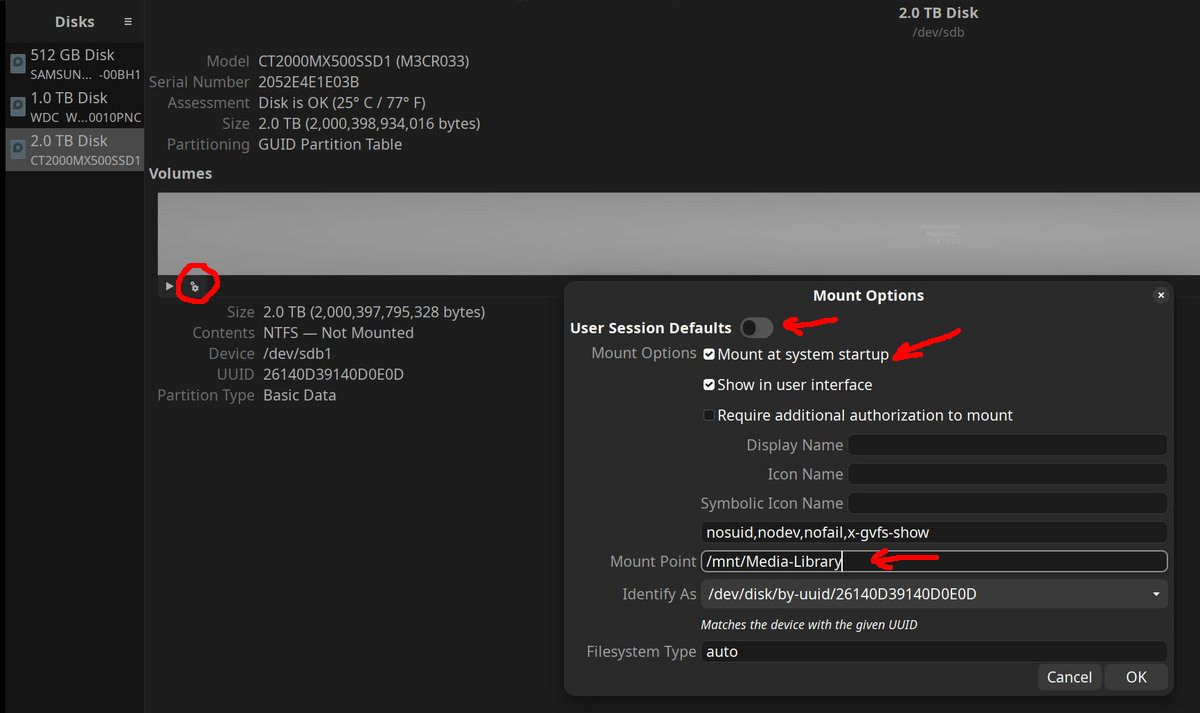
- Click on the TINY gear icon under the Volumes label. It really is hard to tell what it is…
- UNCHECK the top choice “User Session Defaults”.
- Make sure “Mount at system startup” is checked.
- Give the Mount Point a human-readable name if you want.
This worked for me in Zorin OS 18.1 whereas my old method did not. I checked the fstab file and here is what the Disks program wrote. There is a good chance this would work under Ubuntu Linux as well, but I have not tested it. NOTE: For a normal user to access the drive with read/write permissions, you still need to use the chown and chgrp commands listed in the “Create and Run backup script” section.

Previous Method (don’t do both!). It may be deprecated… Any other tech articles on my site would be the Computer category.
Linux Mount Hard Drive by editing /etc/fstab
WARNING: You can seriously mess up access to your system if you ruin the fstab (Filesystem Table) file. Make sure you make a backup FIRST and know how to revert to it!
On a home system, it is easy enough to edit the /etc/fstab file using gedit (sub your text editor here). You must edit this file using “root” (Admin) privilege. In Ubuntu Linux, this is done with the “sudo” command.
me@myhost:~$ sudo gedit /etc/fstabFirstly, if you don’t know the address of the hard drive you can use the generic block device list command. Note: If you don’t see the drive after running this command, you may be able to find it in the file browser. Double click the drive to mount it and that may make it appear in the list.
me@myhost:~$ lsblkI suggest you follow the suggestions in the /etc/fstab file and make your changes robust by getting a UUID number. In a separate terminal, the command for drive /dev/sda1 would be:
me@myhost:~$ sudo blkid /dev/sda1Enter the data using the spacing of the lines above it. There is and explanation of the /etc/fstab file at the Fstab Wiki. In my example, the “/”, “/home”, and “swap” partitions are all on the same disk, but have different UUID numbers generated at installation. For my 2 backup disks, I manually enterd the names “/bu300” and “/bu250” after I had created these directories (folders) at the top level. This file will associate the physical disks to these mount points.
# /etc/fstab: static file system information.
#
#[PARTIAL FILE:  Columns are as follows: File System Name, Mount Point, Filesystem Type, Options, Dump, and Pass*.
#
# / was on /dev/sda1 during installation
UUID=71537a2a-2c85-40b1-9969-6b73ead86456 / ext4 errors=remount-ro 0 1
# /home was on /dev/sda3 during installation
UUID=edbed3cc-dd0a-404c-898e-551eb41a1bb3 /home ext4 defaults  0 2
# swap was on /dev/sda5 during installation
UUID=99e91184-e43b-4889-8bfb-ae86017ed5ec none swap sw 0 0
# Two backup drives 300GB and 250GB.  Get UUID with "blkid" command.
UUID=ab5830c2-6591-48f9-854e-ee702ccdda5b /bu300 ext4 defaults 0 2
UUID=43ff7d13-ece5-4459-9a0c-8421d86d51a0 /bu250 ext4 defaults 0 2
That’s it!. After you restart your computer, the drives will be automatically mounted at the “mount points” listed in the /etc/fstab file.
Create & Run A Backup Script Using rsync
Give yourself permissions if necessary on your /backup drive:
me@myhost$ sudo chown -R USER_NAME /backup
me@myhost$ sudo chgrp -R USER_NAME /backup
The program rsync efficiently synchronizes two folders by only modifying the files in the final directory that have changed since the last synchronization. The -av options DO NOT delete files, though, they only update changed files and add new ones. You need to eventually “clean up” the /backup folder of stuff you REALLY want to delete.
Below is an sample backup script that matches the default files in a Ubuntu Linux installation. In this example the only mount point created was /backup for a single backup hard drive. You need to substitute your user name for USER_NAME.
rsync -av /home/USER_NAME/Documents/    /backup/Documents
rsync -av /home/USER_NAME/Downloads/    /backup/Downloads
rsync -av /home/USER_NAME/Music/        /backup/Music
rsync -av /home/USER_NAME/Pictures/     /backup/Pictures
rsync -av /home/USER_NAME/Public/       /backup/Public
rsync -av /home/USER_NAME/Videos/       /backup/Videos
Scheduling a “cron job” is something more suited to a server that is operating 24×7. An alternative to get regular backups is to add a item to the program Startup Applications. If you named your backup script above “backup.sh” in your home directory, then the “Command” box item would be “/home/USER_NAME/backup.sh”, or “./backup.sh”. For a home-based system that gets turned off regularly, this will cause your files to be backed up every time you turn the comptuer on, and it won’t rely on the computer being on at “X o-clock”. It is probably a better option for me.